Monday, 30 July 2012

How to Start/Stop services in Oracle Apps EBS R12 ( Application / Database Tier)


This post covers step by step instructions of How to Start/Stop services in Oracle Applications R12. These steps are from Online Oracle Apps DBA (11i /R12) training here (This is interactive online course over weekend with hands on exercises on installation, patching, cloning during weekdays)
Assumptions
Application Tier O.S. User : avisr12 (usually applmgr)
Database Tier O.S. User : ovisr12 (usually oracle)
R12 install base : /oracle/apps/r12/visr12
Database SID : visr12
Database Version : 11.1.0
Hostname : focusthreadr12
Operating System : Unix/Linux
Apps Schema Password : apps (apps is default password)
.
Start-Up/Shutdown order
If you are starting services then first start Database Tier services and then Application Tier Services.
If you are shutting down services then first stop Application Tier services and then Database Tier Services.
  
1. Startup
1.1 Start Database Tier
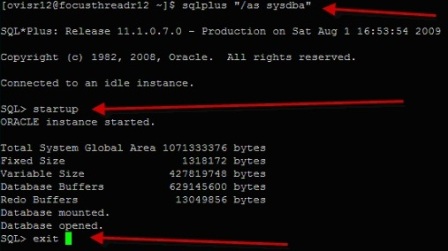
1.1.1
Login as database tier user (ovisr12)
1.1.2 Set environment variable by running $SID_hostname.envfrom $INSTALL_BASE/db/tech_st/11.1.0
—- cd /oracle/apps/r12/visr12/db/tech_st/11.1.0
—- . visr12_focusthreadr12.com (note: dot in front)
1.1.3 Start database
—- sqlplus “/as sysdba”
—- SQL> startup
1.1.4
Start Database Listener (lsnrctl start $SID)
—- lsnrctl start visr12
.
Description: http://onlineappsdba.com/wp-content/uploads/2010/03/start_stop_1.jpg
Description: http://onlineappsdba.com/wp-content/uploads/2010/03/start_stop_2.jpg
Description: http://onlineappsdba.com/wp-content/uploads/2010/03/start_stop_3.jpg
.
1.2 Start Application Tier
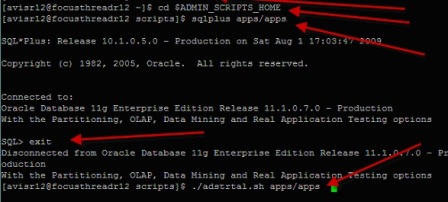
1.2.1
Login as application tier user (avisr12)
1.2.2 Set environment variable by running $SID_hostname.envfrom $INSTALL_BASE/apps/apps_st/appl
—- cd /oracle/apps/r12/visr12/apps/apps_st/appl
—- . visr12_focusthreadr12.com (note: dot in front)
1.2.3 Start Application Tier (adstrtal.sh apps/$apps_password)
—- cd $ADMIN_SCRIPTS_HOME
—- ./adstrtal.sh apps/apps 
Description: http://onlineappsdba.com/wp-content/uploads/2010/03/start_stop_4.jpg
Description: http://onlineappsdba.com/wp-content/uploads/2010/03/start_stop_5.jpg
.
.
2. Shutdown Services
2.1 Shutdown Application Tier
2.1.1
Login as application tier user (avisr12)
2.1.2 Set environment variable by running $SID_hostname.env from $INSTALL_BASE/apps/apps_st/appl
—- cd /oracle/apps/r12/visr12/apps/apps_st/appl
—- . visr12_focusthreadr12.com (note: dot in front)
2.1.3 Stop Application Tier (adstpall.sh apps/$apps_password)
—- cd $ADMIN_SCRIPTS_HOME
—- ./adstpall.sh apps/apps 
.
2.2 Shutdown Database Tier
2.2.1
Login as database tier user (ovisr12)
2.2.2 Set environment variable by running $SID_hostname.env from $INSTALL_BASE/db/tech_st/11.1.0
—- cd /oracle/apps/r12/visr12/db/tech_st/11.1.0
—- . visr12_focusthreadr12.com (note: dot in front)
2.2.3 Stop database
—- sqlplus “/as sysdba”
—- SQL> shutdown immediate
2.2.4
Stop Database Listener (lsnrctl start $SID)
—- lsnrctl stop visr12


Thursday, 12 April 2012

Microsoft® Business Solutions–Navision® 4.0- Indian Value Added Tax

Microsoft® Business Solutions–Navision® 4.0- Indian Value Added Tax Table of Contents Overview of Functionality ...................................................................................... 4
Detailed Setup ................................................................................................... 4
Comprehensive Functionality ............................................................................ 5
Reports .............................................................................................................. 5
Definitions ............................................................................................................. 6
Value Added Tax (VAT) .................................................................................... 6
Input VAT .......................................................................................................... 7
Output VAT........................................................................................................ 7
Input VAT Credit ................................................................................................ 8
Input VAT Credit on Capital Goods ................................................................... 8
Input VAT and Input VAT Credit ........................................................................ 8
VAT Rounding Off ............................................................................................. 9
VAT Setoff and Carry Forward .......................................................................... 9
Inter State Purchases, Sales, and Branch Transfers ......................................... 9
Exports, Deemed Exports, and Supply to EOU Units ........................................ 9
Composition Scheme ........................................................................................ 9
Lease Transactions ......................................................................................... 10
Debit Notes/ Credit Notes ................................................................................ 10
Adjustments in TAX Credit Due to Changes in Usage .................................... 10
Adjustments in TAX Credit Due to Goods Lost / Destroyed or Consumed ...... 10
Setup- Sales Tax (Value Added Tax) .................................................................. 11
Schedules........................................................................................................ 11
States .............................................................................................................. 13
Deferment Period ............................................................................................ 14
Schedule ......................................................................................................... 16
Forms .............................................................................................................. 17
TAX Jurisdictions ............................................................................................. 18
Tax Details ...................................................................................................... 19
Company Information ...................................................................................... 20
Location Card .................................................................................................. 22
Customer Card ................................................................................................ 23
Vendor Card .................................................................................................... 24
Item Card......................................................................................................... 25
Calculation of Input VAT on Item ........................................................................ 25
Viewing the Ledger Entries.............................................................................. 27
Calculation of VAT on Capital Goods. ................................................................. 30
Viewing the Ledger Entries.............................................................................. 33
Calculation of VAT if the Vendor has opted Composition Scheme ..................... 36
Viewing the Ledger Entries.............................................................................. 37
Calculation of Retention Limit on VAT. ............................................................... 40
Viewing the Ledger Entries.............................................................................. 41
Calculation of Vat able Purchase Tax on CST .................................................... 45
Viewing the Ledger Entries.............................................................................. 46
Calculation of VAT if Purchases are meant for Export or Deemed Export .......... 49
Purchase Credit Memo. ...................................................................................... 49
Viewing the Ledger Entries.............................................................................. 50
Calculation of Output VAT .................................................................................. 54
Viewing the Ledger Entries.............................................................................. 54
Calculation of Output VAT in case of Standard Deduction .................................. 57
Viewing the Ledger Entries.............................................................................. 58
Sales of Goods in case of Export or Deemed Export / VAT Exempted ............... 60
Sales Credit Memo ............................................................................................. 61
Viewing the Ledger Entries.............................................................................. 62
VAT Adjustment .................................................................................................. 65
VAT Settlement ................................................................................................... 76
View the posted Ledger Entries....................................................................... 81
VAT Reporting .................................................................................................... 87
Interstate Sales and Purchases....................................................................... 88
Intrastate Sales and Purchases....................................................................... 90
Purchase Book VAT ........................................................................................ 92
Sales Book VAT .............................................................................................. 94
VAT Settlement ............................................................................................... 95
VAT Deferment................................................................................................ 97
VAT Credit Carried Forward ............................................................................ 99
Viewing and Printing the Tax Invoice ............................................................ 100
Appendix ........................................................................................................... 103
Overview of Functionality VAT functionality comprehensively covers the Indian VAT scenario. This functionality is a standard solution for the States / Union Territories (UT) that have implemented or are implementing VAT in India. This functionality provides a common solution for the requirements under all Indian States / UTs VAT Acts. Detailed Setup

VAT functionality contains a detailed setup, which will used in mapping the Tax rate, calculation of Input VAT Credit, Output VAT, VAT Adjustments, and the VAT Settlement process. Setup Area Description
T.I.N. Nos. Various TIN Nos. of the firm are defined.
States State/UT, first two-digits of the TIN of the State, Deferments for the Capital Goods, Schedules of the State, Specified Period for Refund, Tax Period, Retention Limit incase of Branch Transfer, GL account for Input VAT credit, GL account for Output Tax, GL account for VAT Deferred Account, GL account for VAT payable Account, GL account for VAT Refund, and GL account for Excess Input VAT Credit Carried forward are defined.
Tax Groups Item Categories and the Item category, which is a Works contract, are defined.
Tax Jurisdictions Tax Jurisdiction, the State under which it falls, Tax Type, Retention Limit for Non Taxable Sales and whether this retention limit is loaded on the item are defined.
Tax details Tax Jurisdiction and the Item Category, the Schedule, Tax Rate, Capital Good, Creditable Good, Standard Deduction, VAT able Purchase Tax, VAT retention limit are defined.
Schedules All Schedules for States are defined.
Tax Area Locations Tax jurisdiction applicable for Customer/ Vendor State with the Location is defined.
Item Card If the item is fixed asset, and the Tax Group code for the item are defined.
Vendor Card TIN No of the Vendor and whether opted for Composition is defined.
Customer Card TIN No of the Customer and whether the Sale to customer is Export/ Deemed Export Sale or VAT Exempted Sale are

Oracle guru - http://oracle.anilpassi.com/

Descriptive Flexfield Basics in Oracle Apps


Descriptive Flexfield Basics in Oracle Apps

A training article on Descriptive flexfields, also refered as DFF

First some basic Question and answers, and then we will do screenshots detailing how flexfields are configured.

Question: What does DFF mean?
Answer: DFF is a mechanism that lets us create new fields in screens that are delivered by Oracle.

Question: Oh good, but can these new fields be added without modifying/customization of the screen?.
Answer: Yes, certainly. Only some setup is needed, but no programmatic change is needed to setup DFF.

Question: Why the word Descriptive in Name DFF?
Answer: I think Oracle used this terminology because by means of setup...you are describing the structure of these new fields. Or may be Oracle simply used a silly word to distinguish DFF from KFF(discussed in latter training lesson).

Question: Are these DFF's flexible?
Answer: A little flexible, for example, depending upon the value in a field, we can make  either Field1 or Field2  to appear in DFF.

Question: So we create new fields in existing screen, but why the need of doing so?
Answer: Oracle delivers a standard set of fields for each screen, but different customers have different needs, hence Oracle lets us create new fields to the screen.

Question: Are these new fields that get created as a result of DFF free text?
I mean, can end user enter any junk into the new fields that are added via DFF?
Answer: If you attach a value set to the field(at time of setup of dff), then field will no longer be free text. The entered value in the field will be validated, also a list of valid values will be provided in LOV.

Question : Will the values that get entered by the user in dff fields be updated to database?
Answer: Indeed, this happens because for each field that you create using DFF will be mapped to  a column in Oracle Applications.

Question: Can I create a DFF on any database column?
Answer: Not really. Oracle delivers a predefined list of columns for each table that are meant for DFF usage. Only those columns can be mapped to DFF segments. These columns are named similar to ATTRIBUTE1, ATTRIBUTE2, ATTRIBUTE3 ETC. Usually Oracle provides upto 15 columns, but this number can vary. 

Question: Can I add hundreds of fields to a given screen?
Answer: This depends on the number of attribute columns in the table that screen uses. Also, those columns must be flagged as DFF enabled in DFF Registration screen. Don't need to worry much about this because all the ATTRIBUTE columns are by default flagged for their DFF usage.

Question: Hmmm, I can see that DFFs are related to table and columns...
Answer: Yes correct. Each DFF is mapped to one table. And also each segment(or call it field) is mapped to one of the attribute columns in that table.

Question: I want these fields to appear in screen only when certain conditions are met. Is it possible?
Answer: Yes, we have something known as Context Sensitive Descriptive Flexfields.

In Order to do this, we will follow the below steps(screenshots will follow) :-
1.    Navigate to the DFF Registration screen in Oracle Apps and query on Table AP_BANK_BRANCES. Now click on Reference Field
2.    Navigate to DFF Segments screen and query on the Title of the “Bank Branch” and Unfreeze the Flexfield and add segments as to Section "GLOBAL Data Elements" as shown in screenshots.
Here are the screenshots......The descriptions are embedded within the screenshots.

Financials (GL, AP, AR and FA) along

1
My Experience in setting up
Financials (GL, AP, AR and FA) along
with OU setups
2
Executive Overview
...................................................................................................... 3
Introduction
..................................................................................................................... 3
Scope
................................................................................................................................ 4
Feedback
........................................................................Error! Bookmark not defined.
Business Cases
................................................................................................................ 4
Environment Creation
.................................................................................................. 5
General Ledger Basic Setups
..................................................................................... 7
Organization Hierarchy Setup
.................................................................................... 9
Payables (AP) Basic Setups
....................................................................................... 15
Fixed Assets Basic Setups
........................................................................................... 20
Accounts Receivables (AR) Basic Setups
............................................................. 24
References
..................................................................................................................... 33
3
Executive Overview
This document discusses about how I did the complete setups of Oracle
Applications Financial modules (GL, AP, AR, FA) along with required
Organization Hierarchy setups.
Introduction
I did this setup as an experience for myself and to develop an
understanding of the various modules and to get a global idea of what
setups are done and how they interact with each other.
As of now there is no document which talks about the setups at Financials
level. There are beautiful descriptions of setups, that too at length, in
individual user guides. But mostly I found myself lost in those long pages of
user guides. Also my objective was just to understand the basic setups (just
to make it working) and not advanced setup. So I prepared this
document to achieve that objective.
I used this document at least few times to do some test setups and found
to be pretty handy to fix the issues in the setups.
4
Scope
Scope for this document is a very basic setup from scratch for Oracle
Financials. The setup will be a working setup but certainly a very basic
setup and not an advanced kind of a setup.
This document tries to understand the setups required and interaction of
the various setups that we do at various modules level. This will prove to be
useful to do the setups as well as troubleshoot at the very basic level.
Note that, what I show here is my understanding of financials setup, under
no case I can claim that this is accurate and is the only possible way of
setting up Oracle Applications. But this certainly shows my understanding.
Business Cases
I have worked extensively in support a financial module and hence I used
to face the peculiar problem wherein the data is transferred across the
sub-ledgers. E.g. all sub-ledgers transfer data to GL, AP transfers data to
FA, FA in turn to GL. To troubleshoot something in one module needs data
transfers and hence interaction with other sub-ledgers. Also to study
changes in setups on one module, the effect of the same on other
modules needs to be tested before applying in Live instances.
So I had to use the AP, AR, and FA as well. Lot of times, we have test
instances which have most of the setups already in place. But there are
times when existing setups do not help and one is working on a
completely different line of thinking. This means a completely new and
different setup to be done on your own to understand what goes in
setting up. Also to understand, implications of setups done in one module
on other module.
For the beginners there is no joy like joy of setting up complete Oracle
Application and see it doing the basic transactions. It is a really good
learning as well for beginners.
5
Environment Creation
This would involve creation of Users, Responsibilities and assigning the
responsibilities to users.
1] I created a new User for myself.
Navigation = System Administrator Responsibility : Security > Users
2] Assign the following responsibilities to him
System Administrator
These responsibilities were required since the Organization hierarchy and
related setups are done in Inventory Responsibility.
Inventory Super User
6
3] Now I defined a new GL responsibility as well and assign this to my user.
Navigation = System Administrator: Security > Responsibilities
7
General Ledger Basic Setups
4] Logged into the GL responsibility and created a chart of accounts.
Navigation = General Ledger Super User Responsibility: Setup > Financials
> Flex fields > Key > Segments
And then I defined a new Set of Book in the new responsibility.
Navigation: General Ledger Super User > Setup > Financials > Books >
Define
8
5] I set the profile option GL: Set of Books for the new GL responsibility
Navigation: System Administrator : Profile > System, query at the
responsibility level.
9
Organization Hierarchy Setup
6] Now I move to Organization setup.
Navigation: Inventory Super User Responsibility: Setup> Organizations>
Organizations
My understanding of Organization hierarchy is roughly like this:
Business Group
Set of Books
Legal Entity
Operating Unit
Inventory
Organization
Employee
Balance Entity
Asset book
Project Organization
Asset Organization
So I first define the Business Group.
This business group (BG) is attached to the responsibility that I am using for
doing organization setups (in this case the inventory responsibility). This is
done using the profile option HR: Business Group.
10
Once the BG is created and I attached the same to the responsibility,
then go again to the organization form and then define the Legal Entity
(LE).
Note that one single organization can work as legal entity + operating unit
+ inventory org, this is the setup I am doing here. Alternatively I could have
created separate organizations as well.
7] I defined the following information there:
Important Data are:
Date from
Organizations Classifications to be added – GRE / Legal Entity
Organizations Classifications to be added – Operating Unit
Organizations Classifications to be added – Inventory Organization
Enable all of these
11
8] I select GRE / Legal Entity and click on others, in the LOV that appears
select “Legal Entity Accounting” and Click OK
9] In the Legal Entity Accounting, I entered Set of Books name. Save and
click ok.
(This will establish a link between Legal Entity and the set of books)
12
10] After the Legal Entity, I came back to the main form. Now, Operating
Unit setup. Select Operating Unit and Click Others.
11] In the list of values I select Operating Unit Information and click ok
Provide following information there:
Legal Entity
So this creates the link between Operating Unit (OU) and Legal Entity (LE)
Set of books
13
12] Back to the main form I now select Inventory Organization and Click
Others.
Select Accounting Information and click ok
13] I Enter the following information:
Set of books
Legal Entity
And click ok. This creates the link between IO and OU.
Operating Unit
14
14] I again select Inventory Organization and click on Others in the main
form. Select Inventory Information this time.
15] I defined the required information in the inventory organization form as
follows:
Once the above things are done the IO and OU definition is complete.
15
Payables (AP) Basic Setups
16] Now, I go to System Administrator responsibility and create an AP
responsibility.
Assign this new responsibility to my set of books.
17] I defined the two profile options for this new AP responsibility.
GL: Set of Books Name
MO: Operating Unit
16
At this stage the basic OU and SOB setup is ready.
18] Now I need to setup AP. So here we logon to AP responsibility.
Navigation: Setup> Set of Books> Choose, here I assign the set of books to
the responsibility and this create the link of OU and SOB to the
responsibility.
19] Next Step go to Setup> Options> Financials.
I will have to enter numerous code combinations in accounting tab, but
main is the Supplier- Purchasing Tab where I will enter the Inventory
Organization. This creates the link for IO to OU for the responsibility.
17
20] Another important tab here is Encumbrance tab: (not relevant in this
case but just shown for information)
18
21] Next Step go to Setup> Options> Payables
The important setups in this form are:
Tab: Accounting Method > Primary Accounting Method -> Accrual /
Cash. In this tab I will see that the SOB name is coming automatically
based on what we entered in Books Assign form and the profile options in
earlier steps.
Tab: Transfer to GL
Now the AP responsibility setup is also complete
22] Now, I need to open the periods in AP (assuming that the GL period is
already opened. In GL navigation is Setup> Open / Close).
Navigation: Accounting > Control Payables Periods
I noticed that Adjustments periods are missing here. Just set the required
period status to Open. It will not trigger anything.
19
Here AP setup is over and I can start entering invoices, tranferring data to
GL and FA
20
Fixed Assets Basic Setups
23] I move ahead to setup FA.
I start with creation and assignment of new responsibility to our user:
24] Set the GL: Set of Books Name profile option at the Responsibility Level
21
25] Now I have to create an FA Book, so I logon to FA responsibility.
Navigation: Setup > Asset System > Book Controls
Here I can create my own FA Book. I will define the link between Asset
Book and the GL Set of Book in this form.
26] Refer to Natural Accounts, I need to define numerous natural
accounts over there.
22
27] Now I move on to the Journal Categories tab to define numerous
journal categories that will be used by FA when creating journals in GL.
Now my FA Book is ready as well. But before I start entering asset I need to
do one last step.
28] Now go to Setup > Asset System > Asset Categories.
Note for people who have never worked on FA before:.
This is a bit of trick form, so be watchful on this one if you have never
worked on FA before. Query any major-minor category combination.
Keep the cursor where it is shown in the screenshot below and press the
down key. You will find that the books keep on changing for the same
category combination. So here you define the link between category
combination and the Asset Book. (Just click on new button)
If you want to add the category combination, then keep your cursor in
the Category and click on the new button.
23
Once all the required category combinations are assigned to the Asset
books, I am all set to enter the assets as well.
Steps for creation of Assets using AP (Mass Additions)
1] Enter Invoices in AP, ensure that the account that you enter in the
invoice distribution, is the Asset Clearing account or in distributions window
the flag ‘Track as Asset’ is enabled (Note that this flag is hidden, so you
need to ‘show’ the field)
2] In AP -> Run Request Set: Mass Additions Create
3] In AP -> Run Request: Payables Transfer to General Ledger
4] In GL, Post transasctions
5] In FA, go to Mass Additions> Prepare Mass Additions, enter the details
for the asset, mainly the category, the assignment (employee, expense
account and location)
6] Change the queue to POST from NEW
7] In FA, go to Mass Additions> Post Mass Additions (Note that this can be
run only in the periods in which depreciation has not been run)
24
Accounts Receivables (AR) Basic Setups
29] I create Receivables Responsibility for my user
30] I assign the user to my responsibility
25
31] I assign Operating Unit to the AR responsibility.
MO: Operating Unit Profile Option
32] Add OM Menu in AR Menu to simplify the things.
Navigation: System Administrator : Application > Menu
Navigate to OM > Setup> System Parameters > Values form in the AR
responsibility
26
33] If I had not defined the Inventory Organization classification then the
next step would not have worked for me. So far this step, it is important
that Inventory Organization is setup.
The screenshot of my IO definition are as follows:
34] Now in AR responsibility only go to Setup > System > System Options
27
28
35] Saving the setup will trigger some requests, “Flexfield PL/SQL Pre-
Processor”
36] Once these requests are finished. Please submit one more request
from System Administrator responsibility
29
37] After that, I go back to Receivable Responsibility. Open Transactions
form. Now I will not see any error. Before replicating seed data if you open
this Form it shows an error.
38] Before entering transactions ensure that the Periods are Open both in
AR and GL.
Go to Control > Accounting > Open / Close Periods
30
Now I will create Customer
Navigation: Receivable Responsibility: Customers > Standard
39] For creating customer I need to create the customer address as well
run-time
40] After that create remit-to addresses
31
41] Create a Tax Code
Setup > Tax
42] Now enter transaction
32
43] Now transfer to GL
Interface > General Ledger > Submit single request.
44] That will trigger a lot of requests
33
45] Now I go to GL … Enter > Journals form it will show the transaction
I can drilldown from GL to AR and verify that it is the same invoice.
References
General Ledger User Guide
Payables User Guide
Receivables User Guide
Fixed Assets User Guide
DISCLAIMER:
The information in this article is the opinion of the author, not of Oracle Corporation. Any
content, materials, information or software downloaded or otherwise obtained through
the use of the site is done at your own discretion and risk. Oracle shall have no
responsibility for any damage to your computer system or loss of data that results from
the download of any content, materials, information or software.